Okhttp源码解析
更新: 3/10/2026 字数: 0 字 时长: 0 分钟
基本使用
    val client = OkHttpClient.Builder()
      .callTimeout(5000L, java.util.concurrent.TimeUnit.MILLISECONDS)
      .connectTimeout(5000L, java.util.concurrent.TimeUnit.MILLISECONDS)
      .readTimeout(5000L, java.util.concurrent.TimeUnit.MILLISECONDS)
      .writeTimeout(5000L, java.util.concurrent.TimeUnit.MILLISECONDS)
      .retryOnConnectionFailure(true)
      .followRedirects(true)
      .followSslRedirects(true)
      .cache(null) // 设置缓存
      .authenticator(null) // 设置身份验证器
      .certificatePinner(null) // 设置证书锁定器
      .connectionPool(null) // 设置连接池
      .connectionSpecs(listOf()) // 设置连接规范
      .cookieJar(null) // 设置 Cookie 管理器
      .dispatcher(null) // 设置分发器
      .dns(null) // 设置 DNS 解析器
      .eventListenerFactory(null) // 设置事件监听器工厂
      .proxy(null) // 设置代理
      .protocols(listOf()) // 设置支持的协议
      .proxyAuthenticator(null) // 设置代理身份验证器
      .proxySelector(null) // 设置代理选择器
      .socketFactory(null) // 设置 Socket 工厂
      .sslSocketFactory(null) // 设置 SSL Socket 工厂
      .hostnameVerifier(null) // 设置主机名验证器
      .proxy(proxy) // 设置代理
      .build()

    val request = Request.Builder()
      .url("xxx")
      .header("xxx", "xxx")
      .addHeader("xxx", "xxx")
      .post(RequestBody.create(null, "XXX")) // 使用 POST 方法并传入请求体,不写默认为 GET 方法
      .cacheControl(okhttp3.CacheControl.FORCE_NETWORK) // 设置缓存控制
      .tag("custom-tag") // 设置标记
      .build()

    val call = client.newCall(request)

    // 构造 Call 对象之后就可以同步或异步请求,并处理结果了
    // 1、同步
    call.execute().use { response ->
      if (response.isSuccessful) {
        Log.v("test", "同步请求响应:${response.body?.string()}")
      } else {
        Log.e("test", "同步请求失败")
      }
    }
    // 2、异步
    call.enqueue(object : Callback {
      override fun onFailure(call: Call, e: IOException) {
        Log.e("test", "异步请求失败: ${e.message}")
      }

      override fun onResponse(call: Call, response: Response) {
        Log.v("test", "异步请求响应:${response.body?.string()}")
      }
})基本对象
OkhttpClient
请求的配置类,采用建造者模式,便于配置一些请求参数:
open class OkHttpClient internal constructor(
  builder: Builder
) : Cloneable, Call.Factory, WebSocket.Factory {

  constructor() : this(Builder())

  class Builder constructor() {
    //调度器
    internal var dispatcher: Dispatcher = Dispatcher()
    //连接池
    internal var connectionPool: ConnectionPool = ConnectionPool()
    //整体流程拦截器
    internal val interceptors: MutableList<Interceptor> = mutableListOf()
    //网络流程拦截器
    internal val networkInterceptors: MutableList<Interceptor> = mutableListOf()
    //流程监听器
    internal var eventListenerFactory: EventListener.Factory = EventListener.NONE.asFactory()
    //连接失败时是否重连
    internal var retryOnConnectionFailure = true
    //服务器认证设置
    internal var authenticator: Authenticator = Authenticator.NONE
    //是否重定向
    internal var followRedirects = true
    //是否从HTTP重定向到HTTPS
    internal var followSslRedirects = true
    //cookie设置
    internal var cookieJar: CookieJar = CookieJar.NO_COOKIES
    //缓存设置
    internal var cache: Cache? = null
    //DNS设置
    internal var dns: Dns = Dns.SYSTEM
    //代理设置
    internal var proxy: Proxy? = null
    //代理选择器设置
    internal var proxySelector: ProxySelector? = null
    //代理服务器认证设置
    internal var proxyAuthenticator: Authenticator = Authenticator.NONE
    //socket配置
    internal var socketFactory: SocketFactory = SocketFactory.getDefault()
    //https socket配置
    internal var sslSocketFactoryOrNull: SSLSocketFactory? = null
    internal var x509TrustManagerOrNull: X509TrustManager? = null
    internal var connectionSpecs: List<ConnectionSpec> = DEFAULT_CONNECTION_SPECS
    //协议
    internal var protocols: List<Protocol> = DEFAULT_PROTOCOLS
    //域名校验
    internal var hostnameVerifier: HostnameVerifier = OkHostnameVerifier
    internal var certificatePinner: CertificatePinner = CertificatePinner.DEFAULT
    internal var certificateChainCleaner: CertificateChainCleaner? = null
    //请求超时
    internal var callTimeout = 0
    //连接超时
    internal var connectTimeout = 10_000
    //读取超时
    internal var readTimeout = 10_000
    //写入超时
    internal var writeTimeout = 10_000
    internal var pingInterval = 0
    internal var minWebSocketMessageToCompress = RealWebSocket.DEFAULT_MINIMUM_DEFLATE_SIZE
    internal var routeDatabase: RouteDatabase? = null
  }
...Request
也是请求参数的配置,采用建造者模式:
class Request internal constructor(
  @get:JvmName("url") val url: HttpUrl,
  @get:JvmName("method") val method: String,
  @get:JvmName("headers") val headers: Headers,
  @get:JvmName("body") val body: RequestBody?,
  internal val tags: Map<Class<*>, Any>
) {

  open class Builder {
    //请求的URL
    internal var url: HttpUrl? = null
    //请求方法,如:GET、POST..
    internal var method: String
    //请求头
    internal var headers: Headers.Builder
    //请求体
    internal var body: RequestBody? = null
...Call
请求的调用的接口,代表这个请求已经准备好执行/取消,只能执行一次。
interface Call : Cloneable {
  /** 返回发起此调用的原始请求 */
  fun request(): Request

  /**
   * 同步请求,立即执行。
   *
   * 抛出两种异常:
   * 1. 请求失败抛出IOException;
   * 2. 如果在执行过一回的前提下再次执行抛出IllegalStateException;*/
  @Throws(IOException::class)
  fun execute(): Response

  /**
   * 异步请求,将请求安排在将来的某个时间点执行。
   * 如果在执行过一回的前提下再次执行抛出IllegalStateException */
  fun enqueue(responseCallback: Callback)

  /** 取消请求。已经完成的请求不能被取消 */
  fun cancel()

  /** 是否已被执行  */
  fun isExecuted(): Boolean

  /** 是否被取消   */
  fun isCanceled(): Boolean

  /** 一个完整Call请求流程的超时时间配置,默认选自[OkHttpClient.Builder.callTimeout] */
  fun timeout(): Timeout

  /** 克隆这个call,创建一个新的相同的Call */
  public override fun clone(): Call

  /** 利用工厂模式来让 OkHttpClient 来创建 Call对象 */
  fun interface Factory {
    fun newCall(request: Request): Call
  }
}我们在调用newCall方法时,实际上返回的是RealCall类型,这是Call接口的唯一实现类,后面会具体阐述。
Dispatcher
调度器,用来调度Call对象。
class Dispatcher constructor() {
  @get:Synchronized
  @get:JvmName("executorService") val executorService: ExecutorService
    get() {
      if (executorServiceOrNull == null) {
        //创建一个缓存线程池,来处理请求调用
        executorServiceOrNull = ThreadPoolExecutor(0, Int.MAX_VALUE, 60, TimeUnit.SECONDS,
            SynchronousQueue(), threadFactory("$okHttpName Dispatcher", false))
      }
      return executorServiceOrNull!!
    }

  /** 已准备好的异步请求队列 */
  @get:Synchronized
  private val readyAsyncCalls = ArrayDeque<AsyncCall>()

  /** 正在运行的异步请求队列, 包含取消但是还未finish的AsyncCall */
  private val runningAsyncCalls = ArrayDeque<AsyncCall>()

  /** 正在运行的同步请求队列, 包含取消但是还未finish的RealCall */
  private val runningSyncCalls = ArrayDeque<RealCall>()

···
}总结
| 对象 | 作用 |
|---|---|
Call | 请求调用接口,表示这个请求已经准备好可以执行,也可以被取消,只能执行一次。 |
RealCall | Call接口的具体实现类,是应用与网络层之间的连接桥,包含OkHttpClient与Request信息。 |
AsyncCall | RealCall的一个内部类,异步请求调用,其实就是个Runnable,会被放到线程池中进行处理。 |
Dispatcher | 调度器,用来调度Call对象,同时包含线程池与异步请求队列,用来存放与执行AsyncCall对象。 |
Request | 请求类,包含url、method、headers、body。 |
Response | 网络层返回的响应数据。 |
Callback | 响应回调函数接口,包含onFailure、onResponse 两个方法。 |
流程
同步请求
我们先看下execute()方法,这个方法就是进行同步请求:
override fun execute(): Response {
    // 判断是否执行,确保只能执行一次
    check(executed.compareAndSet(false, true)) { "Already Executed" }

    // 请求超时开始计时
    timeout.enter()
    // 开启请求监听
    callStart()
    try {
        // 添加到dispatcher
        client.dispatcher.executed(this)
        // 调用这个方法获取Response
        return getResponseWithInterceptorChain()
    } finally {
        // 从dispatcher中移除
        client.dispatcher.finished(this)
    }
}Dispatcher 内部也只是相应的将 RealCall 添加到 runningSyncCalls 中或者是将其从 runningSyncCalls 中移除,保存到 runningSyncCalls 的目的是为了方便统计当前所有正在运行的请求总数以及能够取消所有请求。此外,由于同步请求会直接运行在调用者所在线程上,所以同步请求并不会受 maxRequests 的限制。
@Synchronized
internal fun executed(call: RealCall) = runningSyncCalls.add(call)

/** Used by [AsyncCall.run] to signal completion. */
internal fun finished(call: AsyncCall) {
    promoteAndExecute(finishedAsyncCall = call)
}

/** Used by [Call.execute] to signal completion. */
internal fun finished(call: RealCall) {
    promoteAndExecute(finishedCall = call)
}异步请求
override fun enqueue(responseCallback: Callback) {
    check(executed.compareAndSet(false, true)) { "Already Executed" }

    callStart()
    client.dispatcher.enqueue(AsyncCall(responseCallback))
}enqueue方法对应的是异步请求,所有Okhttp就需要自己创建线程进行请求,然后用callback将结果回调出去,异步请求逻辑对应的载体就是AsyncCall。
inner class AsyncCall(
    private val responseCallback: Callback,
  ) : Runnable {
    @Volatile var callsPerHost = AtomicInteger(0)
      private set

    fun reuseCallsPerHostFrom(other: AsyncCall) {
      this.callsPerHost = other.callsPerHost
    }

    val host: String
      get() = originalRequest.url.host

    val request: Request
      get() = originalRequest

    val call: RealCall
      get() = this@RealCall

    /**
     * Attempt to enqueue this async call on [executorService]. This will attempt to clean up
     * if the executor has been shut down by reporting the call as failed.
     */
    fun executeOn(executorService: ExecutorService) {
      client.dispatcher.assertLockNotHeld()

      var success = false
      try {
        executorService.execute(this)
        success = true
      } catch (e: RejectedExecutionException) {
        failRejected(e)
      } finally {
        if (!success) {
          client.dispatcher.finished(this) // This call is no longer running!
        }
      }
    }

    internal fun failRejected(e: RejectedExecutionException? = null) {
      val ioException = InterruptedIOException("executor rejected")
      ioException.initCause(e)
      noMoreExchanges(ioException)
      responseCallback.onFailure(this@RealCall, ioException)
    }

    override fun run() {
      threadName("OkHttp ${redactedUrl()}") {
        var signalledCallback = false
        timeout.enter()
        try {
          val response = getResponseWithInterceptorChain()
          signalledCallback = true
          responseCallback.onResponse(this@RealCall, response)
        } catch (e: IOException) {
          if (signalledCallback) {
            // Do not signal the callback twice!
            Platform.get().log("Callback failure for ${toLoggableString()}", Platform.INFO, e)
          } else {
            responseCallback.onFailure(this@RealCall, e)
          }
        } catch (t: Throwable) {
          cancel()
          if (!signalledCallback) {
            val canceledException = IOException("canceled due to $t")
            canceledException.initCause(t)
            responseCallback.onFailure(this@RealCall, canceledException)
          }
          if (t is InterruptedException) {
            Thread.currentThread().interrupt()
          } else {
            throw t
          }
        } finally {
          client.dispatcher.finished(this)
        }
      }
    }
}因为是非静态内部类,故可以访问RealCall的所有变量和方法。此外,他还继承了Runnable接口,executeOn方法用于传入一个线程池对象执行run方法。run 方法内还是调用了 getResponseWithInterceptorChain()方法来获取 response,并通过 Callback 来将执行结果(不管成功还是失败)回调出去,在请求结束后也会将自身从 dispatcher 中移除。
然后我们再看看Dispatcher拿到AsyncCall对象后是如何工作的:
internal fun enqueue(call: AsyncCall) {
    promoteAndExecute(enqueuedCall = call)
}

private fun promoteAndExecute(
    enqueuedCall: AsyncCall? = null,
    finishedCall: RealCall? = null,
    finishedAsyncCall: AsyncCall? = null,
) {
    assertLockNotHeld()
    val executorIsShutdown = executorService.isShutdown

    // Actions to take outside the synchronized block.
    class Effects(
        val callsToExecute: List<AsyncCall>,
        val idleCallbackToRun: Runnable?,
    )

    val effects =
    synchronized(this) {
        if (finishedCall != null) {
            check(runningSyncCalls.remove(finishedCall)) { "Call wasn't in-flight!" }
        }

        if (finishedAsyncCall != null) {
            finishedAsyncCall.callsPerHost.decrementAndGet()
            check(runningAsyncCalls.remove(finishedAsyncCall)) { "Call wasn't in-flight!" }
        }

        if (enqueuedCall != null) {
            readyAsyncCalls.add(enqueuedCall)

            // Mutate the AsyncCall so that it shares the AtomicInteger of an existing running call to
            // the same host.
            if (!enqueuedCall.call.forWebSocket) {
                val existingCall = findExistingCallWithHost(enqueuedCall.host)
                if (existingCall != null) enqueuedCall.reuseCallsPerHostFrom(existingCall)
            }
        }

        val becameIdle =
        (finishedCall != null || finishedAsyncCall != null) &&
        (executorIsShutdown || runningAsyncCalls.isEmpty()) &&
        runningSyncCalls.isEmpty()
        val idleCallbackToRun = if (becameIdle) idleCallback else null

        if (executorIsShutdown) {
            return@synchronized Effects(
                callsToExecute =
                readyAsyncCalls
                .toList()
                .also { readyAsyncCalls.clear() },
                idleCallbackToRun = idleCallbackToRun,
            )
        }

        val callsToExecute = mutableListOf<AsyncCall>()
        val i = readyAsyncCalls.iterator()
        while (i.hasNext()) {
            val asyncCall = i.next()

            // 如果正在执行的异步请求总数超过限制就直接返回
            if (runningAsyncCalls.size >= this.maxRequests) break // Max capacity.
            // 如果指向同个Host的请求总数已经超出限制,则跳到下一个请求
            if (asyncCall.callsPerHost.get() >= this.maxRequestsPerHost) continue // Host max capacity.

            i.remove()

            // 指向该host的连接数+1
            asyncCall.callsPerHost.incrementAndGet()
            // 将asyncCall存到可执行的列表中
            callsToExecute.add(asyncCall)
            // 将asyncCall存到正在执行的列表中
            runningAsyncCalls.add(asyncCall)
        }

        return@synchronized Effects(
            callsToExecute = callsToExecute,
            idleCallbackToRun = idleCallbackToRun,
        )
    }

    var callDispatcherQueueStart = true

    // 这里是执行符合条件的所有请求
    for (i in 0 until effects.callsToExecute.size) {
        val call = effects.callsToExecute[i]

        // If the newly-enqueued call is already out, skip its dispatcher queue events. We only
        // publish those events for calls that have to wait.
        if (call === enqueuedCall) {
            callDispatcherQueueStart = false
        } else {
            call.call.eventListener.dispatcherQueueEnd(call.call, this)
        }

        if (executorIsShutdown) {
            call.failRejected()
        } else {
            call.executeOn(executorService)
        }
    }

    if (callDispatcherQueueStart && enqueuedCall != null) {
        enqueuedCall.call.eventListener.dispatcherQueueStart(enqueuedCall.call, this)
    }

    effects.idleCallbackToRun?.run()
}我们主要看下30-39行代码:
if (enqueuedCall != null) {
    readyAsyncCalls.add(enqueuedCall)

    // Mutate the AsyncCall so that it shares the AtomicInteger of an existing running call to
    // the same host.
    if (!enqueuedCall.call.forWebSocket) {
        // 查找当前是否有指向同一Host的异步请求
        val existingCall = findExistingCallWithHost(enqueuedCall.host)
        if (existingCall != null) enqueuedCall.reuseCallsPerHostFrom(existingCall)
    }
}Dispatcher拿到AsyncCall对象后,会先将其存到readyAsyncCalls中,然后通过 findExistingCallWithHost方法来查找当前是否有指向同一 Host 的异步请求,有的话则交换 callsPerHost 变量,该变量就用于标记当前指向同一 Host 的请求数量。
ArrayDeque:ArrayDeque 属于非线程安全的双端队列,所以涉及到多线程操作时都需要外部主动线程同步。 选择这个作为任务容器的原因在网上看到是这几点:
- ArrayDeque 内部使用数组结构来存储数据,元素具有明确的先后顺序,这符合我们对网络请求先到先执行的基本预期
- 在选择符合运行条件的异步请求时,需要对 readyAsyncCalls 进行遍历,数组在遍历效率上会比较高
- 在遍历到符合条件的请求后,需要将请求从 readyAsyncCalls 中移除并转移到 runningAsyncCalls 中,而 ArrayDeque 作为双端队列,在内存空间利用率上比较高
- Dispatcher 面对的就是多线程环境,本身就需要进行线程同步,选择 ArrayDeque 这个非线程安全的容器可以省去多余的线程同步消耗
推动请求执行
先看看OkHttp的内部的线程池:
private var executorServiceOrNull: ExecutorService? = null

@get:JvmName("executorService")
@get:Synchronized
val executorService: ExecutorService
get() {
    if (executorServiceOrNull == null) {
        executorServiceOrNull =
        ThreadPoolExecutor(
            0,
            Int.MAX_VALUE,
            60,
            TimeUnit.SECONDS,
            SynchronousQueue(),
            threadFactory("$okHttpName Dispatcher", false),
        )
    }
    return executorServiceOrNull!!
}- 核心线程数为0,线程超时时间为60s,即在没有待执行的任务时,如果线程闲置了60s就会被回收,防止了空闲线程浪费系统资源。
- 允许的最大线程数为 Int.MAX_VALUE,可以看做是完全没有限制的,且任务队列是 SynchronousQueue。SynchronousQueue 的特点是当有任务入队时,必须等待该任务被消费否则入队操作就会一直被阻塞,而由于线程池允许的最大线程数量是无限的,所以每个入队的任务都能马上交由线程处理(交付给空闲线程或者新建一个线程来处理),这就保证了任务的处理及时性,符合我们对网络请求应该尽快发起并完成的期望。
但是看似是无限的,实际上提交任务时这个操作还要受maxRequests的限制,所以实际上最多同时运行maxRequests个线程。
既然 OkHttp 内部的线程池是不可能无限制地新建线程来执行请求的,那么当请求总数已达到 maxRequests 后,后续的请求只能是先处于等待状态,那么这些等待状态的请求会在什么时候被启动呢?
同步请求和异步请求结束后都会调用到 Dispatcher 的两个 finished 方法,在这两个方法里又会触发到 promoteAndExecute()方法去遍历任务列表来执行,此时就推动了待处理列表的任务执行操作。所以说,Dispatcher 中的请求都可以看做是在自发性地启动,每个请求结束都会自动触发下一个请求执行(如果有的话),省去了多余的定时检查这类操作。
总结
- 同步请求:网络请求过程会直接在调用者所在线程上完成,不受Dispater的控制
- 异步请求:会先存到待执行列表readyAsyncCalls中,该请求是否可以立即发起受 maxRequests 和 maxRequestsPerHost 两个条件的限制。如果符合条件,那么就会从 readyAsyncCalls 取出并存到 runningAsyncCalls 中,然后交由 OkHttp 内部的线程池来执行。
- 最后都是通过
getResponseWithInterceptorChain()方法获取Response的。 - Dispatcher 内部的线程池本身允许同时运行 Int.MAX_VALUE 个线程,但是实际上的线程数量还是受 maxRequests 的控制
RealInterceptorChain
@Throws(IOException::class)
internal fun getResponseWithInterceptorChain(): Response {
    // Build a full stack of interceptors.
    val interceptors = mutableListOf<Interceptor>()
    // 开发者设置的拦截器
    interceptors += client.interceptors
    // 下面是默认的拦截器
    interceptors += RetryAndFollowUpInterceptor(client)
    interceptors += BridgeInterceptor(client.cookieJar)
    interceptors += CacheInterceptor(client.cache)
    interceptors += ConnectInterceptor
    if (!forWebSocket) {
        // 如果不是 WebSocket 的话,那就再添加开发者设置的 NetworkInterceptors
        interceptors += client.networkInterceptors
    }
    // 这是实际上发起网络请求的地方
    interceptors += CallServerInterceptor

    val chain =
    RealInterceptorChain(
        call = this,
        interceptors = interceptors,
        index = 0,
        exchange = null,
        request = originalRequest,
        connectTimeoutMillis = client.connectTimeoutMillis,
        readTimeoutMillis = client.readTimeoutMillis,
        writeTimeoutMillis = client.writeTimeoutMillis,
    )

    var calledNoMoreExchanges = false
    try {
        val response = chain.proceed(originalRequest)
        if (isCanceled()) {
            response.closeQuietly()
            throw IOException("Canceled")
        }
        return response
    } catch (e: IOException) {
        calledNoMoreExchanges = true
        throw noMoreExchanges(e) as Throwable
    } finally {
        if (!calledNoMoreExchanges) {
            noMoreExchanges(null)
        }
    }
}我们可以看到他主要是通过拦截器来完成整个网络请求的过程,除了会获取外部主动设置的拦截器,也会添加几个默认的拦截器:
- RetryAndFollowUpInterceptor。负责失败重试以及重定向
- BridgeInterceptor。负责对用户构造的 Request 进行转换,添加必要的 header 和 cookie,在得到 response 后如果有需要的会进行 gzip 解压
- CacheInterceptor。用于处理缓存
- ConnectInterceptor。负责和服务器建立连接
- CallServerInterceptor。负责向服务器发送请求和从服务器接收数据
最后request和interceptors会用来生成一个RealInterceptorChain对象,来返回最终的response。
Interceptor是Okhttp重要的部分:
fun interface Interceptor {
    @Throws(IOException::class)
    fun intercept(chain: Chain): Response

    companion object {
        /**
     * Constructs an interceptor for a lambda. This compact syntax is most useful for inline
     * interceptors.
     *
     * ```kotlin
     * val interceptor = Interceptor { chain: Interceptor.Chain ->
     *     chain.proceed(chain.request())
     * }
     * ```
     */
        inline operator fun invoke(crossinline block: (chain: Chain) -> Response): Interceptor = Interceptor { block(it) }
    }

    interface Chain {
        fun request(): Request

        @Throws(IOException::class)
        fun proceed(request: Request): Response

        /**
     * Returns the connection the request will be executed on. This is only available in the chains
     * of network interceptors; for application interceptors this is always null.
     */
        fun connection(): Connection?

        fun call(): Call

        fun connectTimeoutMillis(): Int

        fun withConnectTimeout(
            timeout: Int,
            unit: TimeUnit,
        ): Chain

        fun readTimeoutMillis(): Int

        fun withReadTimeout(
            timeout: Int,
            unit: TimeUnit,
        ): Chain

        fun writeTimeoutMillis(): Int

        fun withWriteTimeout(
            timeout: Int,
            unit: TimeUnit,
        ): Chain
    }
}Interceptor接口本身只有一个intercept方法,在此方法可以拿到原始的Request对象和最终的Response。
Interceptor本身是给开发者提供了一个可以控制网络请求的发起过程及收尾的入口,比如添加header,记录日志,拦截请求,修改ResponseBody等,这样就需要我们添加多个拦截器。而只有让每个拦截器都依次处理完request后,Okhttp才能根据最终的request对象去联网请求得到response,所以每个 Interceptor 需要依次拿到 request 进行自定义处理。请求到 response 后,Interceptor 可能还需要对 response 进行处理,那么就还需要将 response 再依次传递给每个 Interceptor。那么,怎么实现将多个 Interceptor 给串联起来呢?
RealInterceptorChain的实现
核心就是拦截器模式,我们现在来简单模拟实现一个:
package okhttp.interceptor

/**
 * @Desc : 自己实现的InterceptorChain
 * @Author : zzx
 * @Date : 2026/3/10 21:23
 */

class Request()
class Response()

interface Chain {

  fun request(): Request

  fun proceed(request: Request): Response

}

interface Interceptor {
  fun intercept(chain: Chain): Response
}

class RealInterceptorChain(
  private val request: Request,
  private val interceptors: List<Interceptor>,
  private val index: Int
) : Chain {

  private fun copy(index: Int): RealInterceptorChain {
    return RealInterceptorChain(request, interceptors, index)
  }

  override fun request(): Request {
    return request
  }

  override fun proceed(request: Request): Response {
    val next = copy(index = index + 1)
    val interceptor = interceptors[index]
    val response = interceptor.intercept(next)
    return response
  }

}

class HeaderInterceptor : Interceptor {
  override fun intercept(chain: Chain): Response {
    val request = chain.request()
    val response = chain.proceed(request)
    println("HeaderInterceptor ---- getResponse")
    return response
  }
}

class LogInterceptor : Interceptor {
  override fun intercept(chain: Chain): Response {
    val request = chain.request()
    println("LogInterceptor -- getRequest")
    val response = chain.proceed(request)
    println("LogInterceptor ---- getResponse")
    return response
  }
}

/**
 * 真正执行网络请求并生成response对象,不能再调用proceed方法
 * 需放在最后一位
 */
class CallServerInterceptor : Interceptor {
  override fun intercept(chain: Chain): Response {
    val request = chain.request()
    println("CallServerInterceptor -- getRequest")
    val response = Response()
    println("CallServerInterceptor ---- getResponse")
    return response
  }
}

fun main() {
  val interceptors = mutableListOf<Interceptor>().apply {
    add(LogInterceptor())
    add(HeaderInterceptor())
    add(CallServerInterceptor())
  }
  val request = Request()
  val realInterceptorChain = RealInterceptorChain(request, interceptors, 0)
  val response = realInterceptorChain.proceed(request)
  println("main response")
}为了将Interceptor串联起来,会循环获取index指向的下一个Interceptor对象,然后每次构建一个新的RealInterceptorChain对象作为参数来调用intercept方法,这样外部只需要调用一次proceed就可以拿到response对象。我们运行一下:
LogInterceptor -- getRequest
HeaderInterceptor ---- getRequest
CallServerInterceptor -- getRequest
CallServerInterceptor ---- getResponse
HeaderInterceptor ---- getResponse
LogInterceptor ---- getResponse
main response我们可以发现intercept方法是根据添加顺序调用,而response是反方向来传递。实际上就是将多个拦截器以责任链的方式来一层层调用,上一个拦截器处理完后将就将结果传给下一个拦截器,直到最后一个拦截器(即 CallServerInterceptor )处理完后将 Response 再一层层往上传递。
看下官方源码:
class RealInterceptorChain(
    internal val call: RealCall,
    private val interceptors: List<Interceptor>,
    private val index: Int,
    internal val exchange: Exchange?,
    internal val request: Request,
    internal val connectTimeoutMillis: Int,
    internal val readTimeoutMillis: Int,
    internal val writeTimeoutMillis: Int,
) : Interceptor.Chain {
    private var calls: Int = 0

    internal fun copy(
        index: Int = this.index,
        exchange: Exchange? = this.exchange,
        request: Request = this.request,
        connectTimeoutMillis: Int = this.connectTimeoutMillis,
        readTimeoutMillis: Int = this.readTimeoutMillis,
        writeTimeoutMillis: Int = this.writeTimeoutMillis,
    ) = RealInterceptorChain(
        call,
        interceptors,
        index,
        exchange,
        request,
        connectTimeoutMillis,
        readTimeoutMillis,
        writeTimeoutMillis,
    )

    ...

    override fun request(): Request = request

    @Throws(IOException::class)
    override fun proceed(request: Request): Response {
        check(index < interceptors.size)

        calls++

        if (exchange != null) {
            check(exchange.finder.routePlanner.sameHostAndPort(request.url)) {
                "network interceptor ${interceptors[index - 1]} must retain the same host and port"
            }
            check(calls == 1) {
                "network interceptor ${interceptors[index - 1]} must call proceed() exactly once"
            }
        }

        // Call the next interceptor in the chain.
        // index + 1,复制创建新的责任链,意味着调用责任链的下一个拦截器
        val next = copy(index = index + 1, request = request)
        val interceptor = interceptors[index]

        // 执行intercept方法
        @Suppress("USELESS_ELVIS")
        val response =
        interceptor.intercept(next) ?: throw NullPointerException(
            "interceptor $interceptor returned null",
        )

        if (exchange != null) {
            check(index + 1 >= interceptors.size || next.calls == 1) {
                "network interceptor $interceptor must call proceed() exactly once"
            }
        }

        return response
    }
}可以看到是类似的。
Interceptor
构建OkhttpClient时,添加拦截器的方式除了addInterceptor,还有addNetworkInterceptor:
val okhttpClient = OkHttpClient.Builder()
      .addInterceptor { chain ->
        chain.proceed(chain.request())
      }
      .addNetworkInterceptor { chain ->
        chain.proceed(chain.request())
      }
.build()Interceptor 和 NetworkInterceptor 分别被称为应用拦截器和网络拦截器,那么它们有什么区别呢?
前面有讲到,OkHttp 在执行拦截器的时候,是按照如下顺序的,这个顺序就已经决定了不同拦截器的调用时机差异
val interceptors = mutableListOf<Interceptor>()
interceptors += client.interceptors
interceptors += RetryAndFollowUpInterceptor(client)
interceptors += BridgeInterceptor(client.cookieJar)
interceptors += CacheInterceptor(client.cache)
interceptors += ConnectInterceptor
if (!forWebSocket) {
  	interceptors += client.networkInterceptors
}
interceptors += CallServerInterceptor(forWebSocket)- 由于应用拦截器处于列表头部,所以在整个责任链路中应用拦截器会首先被执行,即使之后在 RetryAndFollowUpInterceptor 中发生了请求失败重试或者网络重定向等情况,应用拦截器也只会被触发一次,但网络拦截器会被调用多次(也可能一次不执行)
- 网络拦截器位于 CacheInterceptor 之后,那么当 CacheInterceptor 命中缓存的时候就不会去执行网络请求了,此时网络拦截器就不会被调用,因此网络拦截器是存在短路的可能。此外,网络拦截器位于 ConnectInterceptor 之后,在调用网络拦截器之前就已经准备好网络链接了,说明网络拦截器本身就关联着实际的网络请求逻辑
- 从单次请求流程上来看,应用拦截器被调用并不意味着真正有发起了网络请求,而网络拦截器被调用就说明的确发起了一次网络请求。因此如果我们希望通过拦截器来记录网络请求详情的话,就需要考虑两者的调用时机差异:应用拦截器无法感知到 OkHttp 自动添加的一些 header,但是网络拦截器可以;应用拦截器除非主动中断请求,否则每次请求一定都会被执行,但网络拦截器可能存在被短路的可能
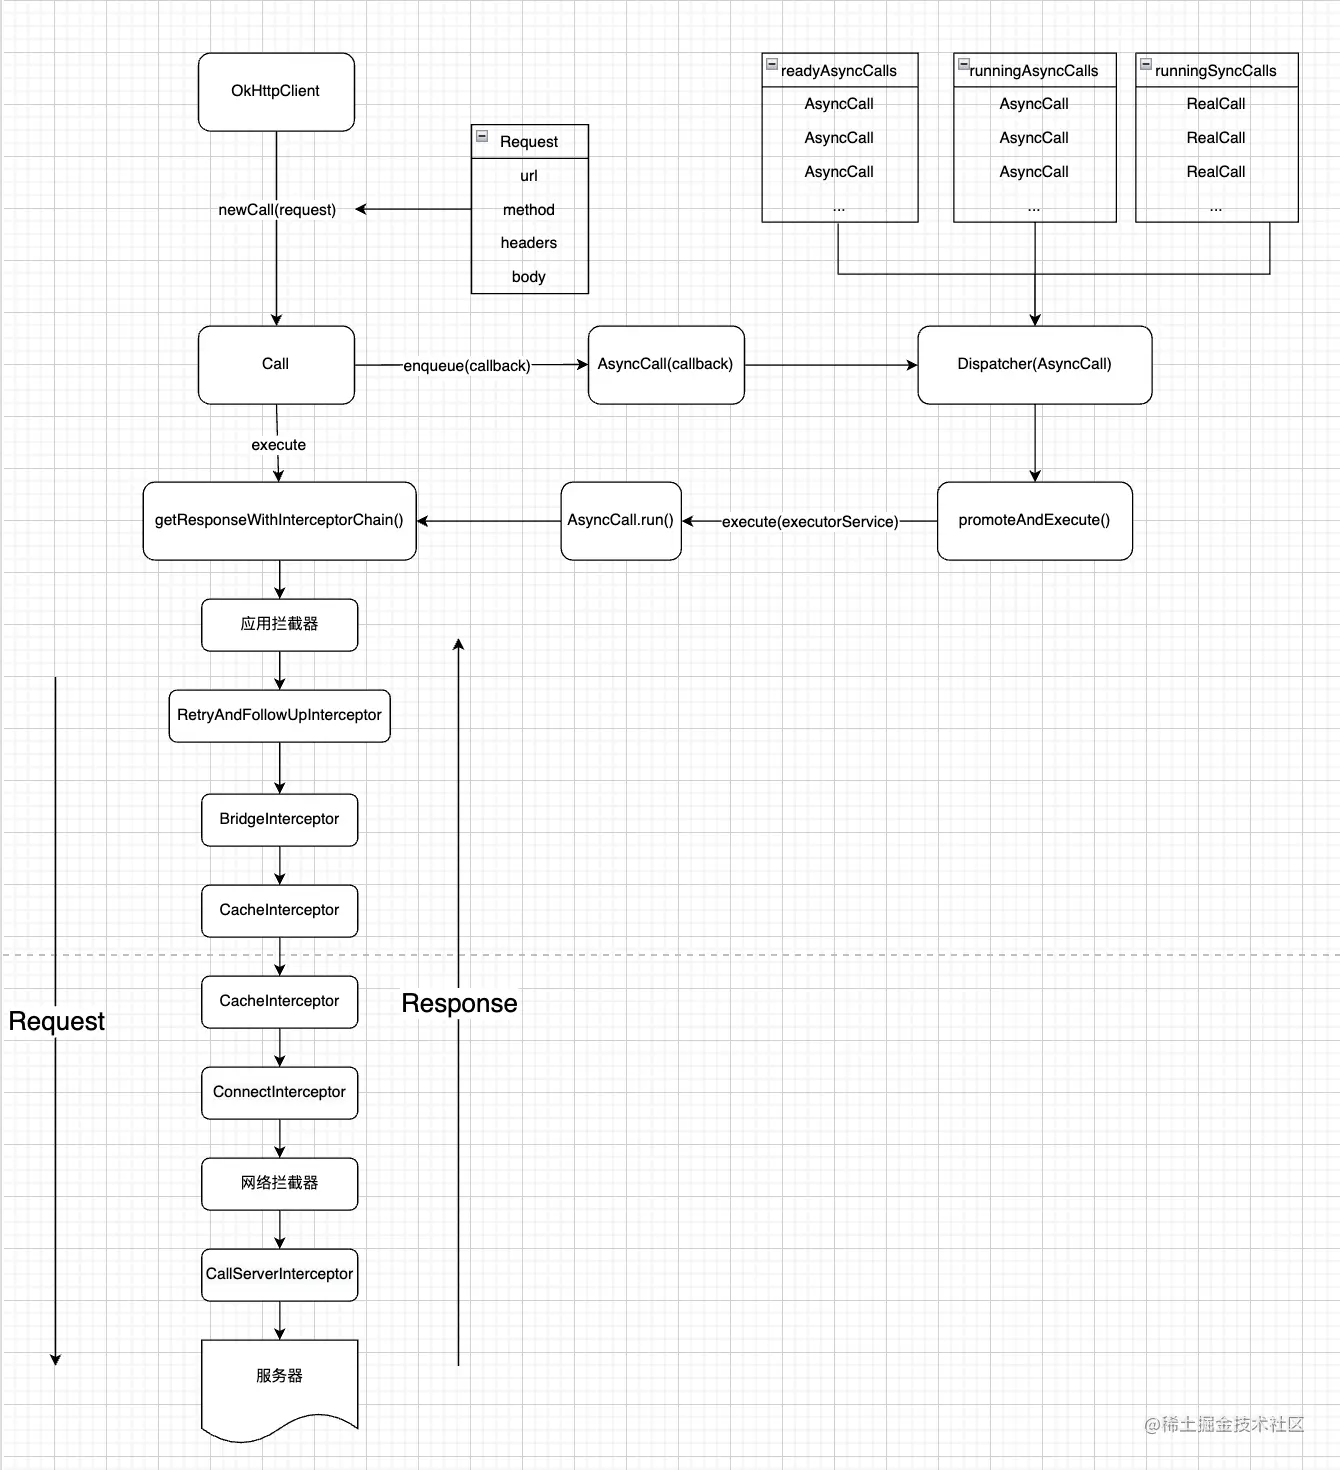
放一张网上的总结流程图:

TODO: 官方给出的下载图片进度的sample,通过addNetworkInterceptor实现,自己下来可以看一下大概怎么实现的:
/**
 * @Author: leavesCZY
 * @Github:https://github.com/leavesCZY
 */
fun main() {
    run()
}

interface ProgressListener {
    fun update(bytesRead: Long, contentLength: Long, done: Boolean)
}

private fun run() {
    val request = Request.Builder()
        .url("https://images.pexels.com/photos/5177790/pexels-photo-5177790.jpeg")
        .build()
    val progressListener: ProgressListener = object : ProgressListener {
        var firstUpdate = true
        override fun update(bytesRead: Long, contentLength: Long, done: Boolean) {
            if (done) {
                println("completed")
            } else {
                if (firstUpdate) {
                    firstUpdate = false
                    if (contentLength == -1L) {
                        println("content-length: unknown")
                    } else {
                        System.out.format("content-length: %d\n", contentLength)
                    }
                }
                println(bytesRead)
                if (contentLength != -1L) {
                    System.out.format("%d%% done\n", 100 * bytesRead / contentLength)
                }
            }
        }
    }
    val client = OkHttpClient.Builder()
        .addNetworkInterceptor { chain: Interceptor.Chain ->
            val originalResponse = chain.proceed(chain.request())
            originalResponse.newBuilder()
                .body(ProgressResponseBody(originalResponse.body!!, progressListener))
                .build()
        }
        .build()
    client.newCall(request).execute().use { response ->
        if (!response.isSuccessful) {
            throw IOException("Unexpected code $response")
        }
        val desktopDir = FileSystemView.getFileSystemView().homeDirectory
        val imageFile = File(desktopDir, "${System.currentTimeMillis()}.jpeg")
        imageFile.createNewFile()
        //读取 InputStream 写入到图片文件中
        response.body!!.byteStream().copyTo(imageFile.outputStream())
    }
}

private class ProgressResponseBody constructor(
    private val responseBody: ResponseBody,
    private val progressListener: ProgressListener
) : ResponseBody() {

    private var bufferedSource: BufferedSource? = null

    override fun contentType(): MediaType? {
        return responseBody.contentType()
    }

    override fun contentLength(): Long {
        return responseBody.contentLength()
    }

    override fun source(): BufferedSource {
        if (bufferedSource == null) {
            bufferedSource = source(responseBody.source()).buffer()
        }
        return bufferedSource!!
    }

    private fun source(source: Source): Source {

        return object : ForwardingSource(source) {

            var totalBytesRead = 0L

            @Throws(IOException::class)
            override fun read(sink: Buffer, byteCount: Long): Long {
                val bytesRead = super.read(sink, byteCount)
                // read() returns the number of bytes read, or -1 if this source is exhausted.
                totalBytesRead += if (bytesRead != -1L) bytesRead else 0
                progressListener.update(totalBytesRead, responseBody.contentLength(), bytesRead == -1L)
                return bytesRead
            }
        }
    }

}最后输出类似于:
content-length: 11448857
467
0% done
1836
0% done
3205

···

99% done
11442570
99% done
11448857
100% done
completed总结
设计模式:建造者模式、工厂模式、责任链模式(实现拦截器的核心)