Gradle
更新: 1/24/2026 字数: 0 字 时长: 0 分钟
Gradle中的DSL
Groovy DSL
新建项目后看一下app/build.gradle:
plugins {
    alias(libs.plugins.android.application)
}

android {
    namespace 'com.generals.gradlestudy'
    compileSdk 36

    defaultConfig {
        applicationId "com.generals.gradlestudy"
        minSdk 26
        targetSdk 36
        versionCode 1
        versionName "1.0"

        testInstrumentationRunner "androidx.test.runner.AndroidJUnitRunner"
    }

    buildTypes {
        release {
            minifyEnabled false
            proguardFiles getDefaultProguardFile('proguard-android-optimize.txt'), 'proguard-rules.pro'
        }
    }
    compileOptions {
        sourceCompatibility JavaVersion.VERSION_11
        targetCompatibility JavaVersion.VERSION_11
    }
}

dependencies {

    implementation libs.appcompat
    implementation libs.material
    implementation libs.activity
    implementation libs.constraintlayout
    testImplementation libs.junit
    androidTestImplementation libs.ext.junit
    androidTestImplementation libs.espresso.core
}第一段中的代码用于声明引入Gradle插件plugin的DSL代码。完整版:
plugins {
    id 'com.android.application' version '7.3.0' apply false
}而我们发现现在创建的默认写的是alias(libs.plugins.android.application),这是因为官方推荐用Version Catalog的方式进行集中管理,gradle会自动进行展开引用。
调用的是PluginDependenciesSpec中的id(String id)函数,返回PluginDependencySpec对象,PluginDependencySpec对象可以理解为是PluginDependenciesSpec的一层封装,比如id(String id)函数只有一个参数,那version、apply哪里来的呢,就是在PluginDependencySpec对象里的。
plugins这段代码实际上是一个函数,plugins{}里面接收的是一个闭包,也可以写成下面这样:
plugins ({
    id 'com.android.application'
})在kotlin的写法中,则是:
plugins {
    id("com.android.application")
}

// 完整版
plugins {
    id("com.android.application") version "7.3.0" apply false
}简单介绍一下闭包:
def myColure = { param ->
    param + 1
}
println(myColure(1))就可以理解成一个函数,可以接收参数,可以发现有点类似于kotlin中的高阶函数
如何测试gradle/groovy:可以使用task来进行测试,例如:
groovytasks.register("testGroovy") { doLast { def list = [1, 2, 3] list.each { println it } def map = [a: 1, b: 2] println map.a } }然后点击左边的绿色三角形运行即可,或者命令行输入
./gradlew testGroovy。另,也可以在Tools-Groovy Console里进行测试。
groovy的语法在这篇文章上有:https://juejin.cn/post/7166638852503765006
Gradle的生命周期
三个阶段
Gradle在评估和运行构建时有三个阶段:
- Initialization(初始化)。Gradle会决定构建中包含哪些项目,并为每个项目创建Project实例。为了决定构建中会包含哪些项目,Gradle首先会寻找settings.gradle来决定此次为单项目构建还是多项目构建,单项目就是module,多项目即project+app+module(1+n)。
- Configuration(配置)阶段,Gradle会评估构建项目中包含的所有构建脚本,随后应用插件、使用DSL配置构建,并在最后注册Task,同时惰性注册它们的输入,因为并不一定会执行。
- Execution(执行)阶段,Gradle会执行构建所需的Task集合。
生命周期本质就是在各个阶段把Task组合起来,然后去构建项目。Task是Gradle构建的核心,Task之间是有依赖的,Gradle会在构建期间来生成依赖关系图,即Task集合。
Initialization
Settings
build.gradle里面的配置和方法调用委托的是Project对象,而同样是构建脚本的settings.gradle里面的配置和方法调用委托的是Settings对象。
在Gradle构建时会创建一个Settings实例,并根据它执行设置文件。Settings实例和settings.gradle文件是一对一的对应关系。
项目管理
对于settings.gradle文件:
- 单项目构建,这个文件是可选的。
- 多项目构建,这个文件是必须的,且必须位于项目的根目录下。
多项目构建的settings.gradle文件(这里以kts为例):
pluginManagement {
    repositories {
        google {
            content {
                includeGroupByRegex("com\\.android.*")
                includeGroupByRegex("com\\.google.*")
                includeGroupByRegex("androidx.*")
            }
        }
        mavenCentral()
        gradlePluginPortal()
    }
}
dependencyResolutionManagement {
    repositoriesMode.set(RepositoriesMode.FAIL_ON_PROJECT_REPOS)
    repositories {
        google()
        mavenCentral()
    }
}

rootProject.name = "WanAndroid_Multi"
include(":app")
include(":lib_util")
include(":lib_base")
include(":module_main")
include(":lib_config")
include(":module_login")
include(":module_login:api_login")关键是include,表示给指定的项目添加到构建中,可以指向我们项目包含的module路径,也可以指向硬盘中子项目的绝对路径。
插件管理
settings.gradle除了管理项目外,还能管理插件(Plugin),即pluginManagement。pluginManagement中指定了插件所需要的下载仓库地址。
pluginManagement配置是由PluginManagementSpec接口类解析的,有五个方法:
includeBuild(rootProject)includeBuild(rootProject, configuration)plugins(action)repositories(repositoriesAction)resolutionStrategy(action)
我们主要用到的是resolutionStrategy:
@HasInternalProtocol
public interface PluginResolutionStrategy {

    /**
     * Adds an action that is executed for each plugin that is resolved.
     * The {@link PluginResolveDetails} parameter contains information about
     * the plugin that was requested and allows the rule to modify which plugin
     * will actually be resolved.
     */
    void eachPlugin(Action<? super PluginResolveDetails> rule);

}PluginResolutionStrategy允许在PluginRequest之前对其进行修改,并有唯一回调eachPlugin,eachPlugin的参数类型是PluginResolveDetails。
PluginResolveDetails:
public interface PluginResolveDetails {

    /**
     * 获取请求的插件,返回PluginRequest对象,包含id,version,module信息
     */
    PluginRequest getRequested();

    /**
     * 设置插件的模块
     *
     * @param notation the module to use, supports the same notations as {@link org.gradle.api.artifacts.dsl.DependencyHandler}
     */
    void useModule(Object notation);

    /**
     * 设置插件的版本
     *
     * @param version version to use
     */
    void useVersion(@Nullable String version);

    /**
     * 请求的目标插件
     */
    PluginRequest getTarget();

}插件替换主要用到的就是useModule方法:
     resolutionStrategy {
         eachPlugin {
            if (requested.id.id == "org.gradle.sample") {
                useModule("xxx")
            }
         }
}useVersion("2.0")则可以设置插件版本。
设置插件版本后,在所有的build script中通过plugins{}引入插件则无需再次指定版本。
Configuration
在Configuration(配置)阶段,Gradle会评估构建项目中包含的所有构建脚本,然后应用插件,使用DSL配置构建,并在最后注册Task,同时惰性注册它们的输入,因为并不一定会执行。
配置阶段无论请求哪个Task都会执行,所以要避免在配置阶段执行任何耗时操作。
配置阶段就是创建Project对象,执行build.gradle文件,并创建对应的Task依赖关系图。
Project
Gradle构建过程中,会根据Settings对象解析出来的项目结构为每个项目创建一个Project对象。在生成Task依赖关系图之前,Project对象还做了几件事:引入插件、配置属性以及编译依赖。
引入插件
plugins {
    alias(libs.plugins.android.application)
    alias(libs.plugins.kotlin.android)
}plugins是Project对象的一个方法,用于设置当前模块所使用的插件。
配置属性
android {
    namespace = "com.generals.wanandroid_multi"
    compileSdk = 35

    defaultConfig {
        applicationId = "com.generals.wanandroid_multi"
        minSdk = 26
        targetSdk = 34
        versionCode = 1
        versionName = "1.0"

        testInstrumentationRunner = "androidx.test.runner.AndroidJUnitRunner"
    }

    buildTypes {
        release {
            isMinifyEnabled = false
            proguardFiles(
                getDefaultProguardFile("proguard-android-optimize.txt"),
                "proguard-rules.pro"
            )
        }
    }
    compileOptions {
        sourceCompatibility = JavaVersion.VERSION_11
        targetCompatibility = JavaVersion.VERSION_11
    }
    kotlinOptions {
        jvmTarget = "11"
    }
}android{}配置实际是application插件的DSL配置,这些配置都是通过DSL对插件进行配置,这些配置会影响插件的执行,从而影响整个构建流程。
编译依赖
就是dependencies里面的内容,除了官方库以外,还可以添加常用的三方库。
Execution
在 Execution (执行) 阶段,Gradle会执行构建所需的Task集合。
其实这个阶段才是真正的编译打包,于Android而言,比如我们常见的compileDebugJavaWithJavac、mergeDebugNativeLibs等等。
Gradle常用命令与参数
Gradle命令
Gradle执行命令主要用到的是Gradle Wrapper,我们常用的./gradlew,gradlew即Gradle Wrapper的简写。
看下gradlew的脚本内容:
#!/usr/bin/env sh

#
# Copyright 2015 the original author or authors.
#
# Licensed under the Apache License, Version 2.0 (the "License");
# you may not use this file except in compliance with the License.
# You may obtain a copy of the License at
#
#      https://www.apache.org/licenses/LICENSE-2.0
#
# Unless required by applicable law or agreed to in writing, software
# distributed under the License is distributed on an "AS IS" BASIS,
# WITHOUT WARRANTIES OR CONDITIONS OF ANY KIND, either express or implied.
# See the License for the specific language governing permissions and
# limitations under the License.
#

##############################################################################
##
##  Gradle start up script for UN*X
##
##############################################################################

# Attempt to set APP_HOME
# Resolve links: $0 may be a link
PRG="$0"
# Need this for relative symlinks.
while [ -h "$PRG" ] ; do
    ls=`ls -ld "$PRG"`
    link=`expr "$ls" : '.*-> \(.*\)$'`
    if expr "$link" : '/.*' > /dev/null; then
        PRG="$link"
    else
        PRG=`dirname "$PRG"`"/$link"
    fi
done
SAVED="`pwd`"
cd "`dirname \"$PRG\"`/" >/dev/null
APP_HOME="`pwd -P`"
cd "$SAVED" >/dev/null

APP_NAME="Gradle"
APP_BASE_NAME=`basename "$0"`

# Add default JVM options here. You can also use JAVA_OPTS and GRADLE_OPTS to pass JVM options to this script.
DEFAULT_JVM_OPTS='"-Xmx64m" "-Xms64m"'

# Use the maximum available, or set MAX_FD != -1 to use that value.
MAX_FD="maximum"

warn () {
    echo "$*"
}

die () {
    echo
    echo "$*"
    echo
    exit 1
}

# OS specific support (must be 'true' or 'false').
cygwin=false
msys=false
darwin=false
nonstop=false
case "`uname`" in
  CYGWIN* )
    cygwin=true
    ;;
  Darwin* )
    darwin=true
    ;;
  MINGW* )
    msys=true
    ;;
  NONSTOP* )
    nonstop=true
    ;;
esac

CLASSPATH=$APP_HOME/gradle/wrapper/gradle-wrapper.jar


# Determine the Java command to use to start the JVM.
if [ -n "$JAVA_HOME" ] ; then
    if [ -x "$JAVA_HOME/jre/sh/java" ] ; then
        # IBM's JDK on AIX uses strange locations for the executables
        JAVACMD="$JAVA_HOME/jre/sh/java"
    else
        JAVACMD="$JAVA_HOME/bin/java"
    fi
    if [ ! -x "$JAVACMD" ] ; then
        die "ERROR: JAVA_HOME is set to an invalid directory: $JAVA_HOME

Please set the JAVA_HOME variable in your environment to match the
location of your Java installation."
    fi
else
    JAVACMD="java"
    which java >/dev/null 2>&1 || die "ERROR: JAVA_HOME is not set and no 'java' command could be found in your PATH.

Please set the JAVA_HOME variable in your environment to match the
location of your Java installation."
fi

# Increase the maximum file descriptors if we can.
if [ "$cygwin" = "false" -a "$darwin" = "false" -a "$nonstop" = "false" ] ; then
    MAX_FD_LIMIT=`ulimit -H -n`
    if [ $? -eq 0 ] ; then
        if [ "$MAX_FD" = "maximum" -o "$MAX_FD" = "max" ] ; then
            MAX_FD="$MAX_FD_LIMIT"
        fi
        ulimit -n $MAX_FD
        if [ $? -ne 0 ] ; then
            warn "Could not set maximum file descriptor limit: $MAX_FD"
        fi
    else
        warn "Could not query maximum file descriptor limit: $MAX_FD_LIMIT"
    fi
fi

# For Darwin, add options to specify how the application appears in the dock
if $darwin; then
    GRADLE_OPTS="$GRADLE_OPTS \"-Xdock:name=$APP_NAME\" \"-Xdock:icon=$APP_HOME/media/gradle.icns\""
fi

# For Cygwin or MSYS, switch paths to Windows format before running java
if [ "$cygwin" = "true" -o "$msys" = "true" ] ; then
    APP_HOME=`cygpath --path --mixed "$APP_HOME"`
    CLASSPATH=`cygpath --path --mixed "$CLASSPATH"`

    JAVACMD=`cygpath --unix "$JAVACMD"`

    # We build the pattern for arguments to be converted via cygpath
    ROOTDIRSRAW=`find -L / -maxdepth 1 -mindepth 1 -type d 2>/dev/null`
    SEP=""
    for dir in $ROOTDIRSRAW ; do
        ROOTDIRS="$ROOTDIRS$SEP$dir"
        SEP="|"
    done
    OURCYGPATTERN="(^($ROOTDIRS))"
    # Add a user-defined pattern to the cygpath arguments
    if [ "$GRADLE_CYGPATTERN" != "" ] ; then
        OURCYGPATTERN="$OURCYGPATTERN|($GRADLE_CYGPATTERN)"
    fi
    # Now convert the arguments - kludge to limit ourselves to /bin/sh
    i=0
    for arg in "$@" ; do
        CHECK=`echo "$arg"|egrep -c "$OURCYGPATTERN" -`
        CHECK2=`echo "$arg"|egrep -c "^-"`                                 ### Determine if an option

        if [ $CHECK -ne 0 ] && [ $CHECK2 -eq 0 ] ; then                    ### Added a condition
            eval `echo args$i`=`cygpath --path --ignore --mixed "$arg"`
        else
            eval `echo args$i`="\"$arg\""
        fi
        i=`expr $i + 1`
    done
    case $i in
        0) set -- ;;
        1) set -- "$args0" ;;
        2) set -- "$args0" "$args1" ;;
        3) set -- "$args0" "$args1" "$args2" ;;
        4) set -- "$args0" "$args1" "$args2" "$args3" ;;
        5) set -- "$args0" "$args1" "$args2" "$args3" "$args4" ;;
        6) set -- "$args0" "$args1" "$args2" "$args3" "$args4" "$args5" ;;
        7) set -- "$args0" "$args1" "$args2" "$args3" "$args4" "$args5" "$args6" ;;
        8) set -- "$args0" "$args1" "$args2" "$args3" "$args4" "$args5" "$args6" "$args7" ;;
        9) set -- "$args0" "$args1" "$args2" "$args3" "$args4" "$args5" "$args6" "$args7" "$args8" ;;
    esac
fi

# Escape application args
save () {
    for i do printf %s\\n "$i" | sed "s/'/'\\\\''/g;1s/^/'/;\$s/\$/' \\\\/" ; done
    echo " "
}
APP_ARGS=`save "$@"`

# Collect all arguments for the java command, following the shell quoting and substitution rules
eval set -- $DEFAULT_JVM_OPTS $JAVA_OPTS $GRADLE_OPTS "\"-Dorg.gradle.appname=$APP_BASE_NAME\"" -classpath "\"$CLASSPATH\"" org.gradle.wrapper.GradleWrapperMain "$APP_ARGS"

exec "$JAVACMD" "$@"- 获取电脑系统内核的信息,JRE环境信息等;
- 设置classpath路径;
- 执行java命令工具,调用gradle jar包的class文件;
查看命令
使用./gradlew --help查看支持哪些命令:
-?, -h, --help                     Shows this help message.
-a, --no-rebuild                   Do not rebuild project dependencies.
-b, --build-file                   Specify the build file. [deprecated]
--build-cache                      Enables the Gradle build cache. Gradle will try to reuse outputs from previous builds.
--no-build-cache                   Disables the Gradle build cache.
-c, --settings-file                Specify the settings file. [deprecated]
--configuration-cache              Enables the configuration cache. Gradle will try to reuse the build configuration from previous builds.
--no-configuration-cache           Disables the configuration cache.
--configuration-cache-problems     Configures how the configuration cache handles problems (fail or warn). Defaults to fail.
--configure-on-demand              Configure necessary projects only. Gradle will attempt to reduce configuration time for large multi-project builds. [incubating]
--no-configure-on-demand           Disables the use of configuration on demand. [incubating]
--console                          Specifies which type of console output to generate. Values are 'plain', 'auto' (default), 'rich' or 'verbose'.
--continue                         Continue task execution after a task failure.
--no-continue                      Stop task execution after a task failure.
-D, --system-prop                  Set system property of the JVM (e.g. -Dmyprop=myvalue).
-d, --debug                        Log in debug mode (includes normal stacktrace).
--daemon                           Uses the Gradle daemon to run the build. Starts the daemon if not running.
--no-daemon                        Do not use the Gradle daemon to run the build. Useful occasionally if you have configured Gradle to always run with the daemon by default.
--export-keys                      Exports the public keys used for dependency verification.
-F, --dependency-verification      Configures the dependency verification mode. Values are 'strict', 'lenient' or 'off'.
--foreground                       Starts the Gradle daemon in the foreground.
-g, --gradle-user-home             Specifies the Gradle user home directory. Defaults to ~/.gradle
-I, --init-script                  Specify an initialization script.
-i, --info                         Set log level to info.
--include-build                    Include the specified build in the composite.
-M, --write-verification-metadata  Generates checksums for dependencies used in the project (comma-separated list)
-m, --dry-run                      Run the builds with all task actions disabled.
--max-workers                      Configure the number of concurrent workers Gradle is allowed to use.
--offline                          Execute the build without accessing network resources.
-P, --project-prop                 Set project property for the build script (e.g. -Pmyprop=myvalue).
-p, --project-dir                  Specifies the start directory for Gradle. Defaults to current directory.
--parallel                         Build projects in parallel. Gradle will attempt to determine the optimal number of executor threads to use.
--no-parallel                      Disables parallel execution to build projects.
--priority                         Specifies the scheduling priority for the Gradle daemon and all processes launched by it. Values are 'normal' (default) or 'low'
--profile                          Profile build execution time and generates a report in the <build_dir>/reports/profile directory.
--project-cache-dir                Specify the project-specific cache directory. Defaults to .gradle in the root project directory.
-q, --quiet                        Log errors only.
--refresh-keys                     Refresh the public keys used for dependency verification.
--rerun-tasks                      Ignore previously cached task results.
-S, --full-stacktrace              Print out the full (very verbose) stacktrace for all exceptions.
-s, --stacktrace                   Print out the stacktrace for all exceptions.
--scan                             Creates a build scan. Gradle will emit a warning if the build scan plugin has not been applied. (https://gradle.com/build-scans)
--no-scan                          Disables the creation of a build scan. For more information about build scans, please visit https://gradle.com/build-scans.
--status                           Shows status of running and recently stopped Gradle daemon(s).
--stop                             Stops the Gradle daemon if it is running.
-t, --continuous                   Enables continuous build. Gradle does not exit and will re-execute tasks when task file inputs change.
-U, --refresh-dependencies         Refresh the state of dependencies.
--update-locks                     Perform a partial update of the dependency lock, letting passed in module notations change version. [incubating]
-V, --show-version                 Print version info and continue.
-v, --version                      Print version info and exit.
-w, --warn                         Set log level to warn.
--warning-mode                     Specifies which mode of warnings to generate. Values are 'all', 'fail', 'summary'(default) or 'none'
--watch-fs                         Enables watching the file system for changes, allowing data about the file system to be re-used for the next build.
--no-watch-fs                      Disables watching the file system.
--write-locks                      Persists dependency resolution for locked configurations, ignoring existing locking information if it exists
-x, --exclude-task                 Specify a task to be excluded from execution.
-- Signals the end of built-in options. Gradle parses subsequent parameters as only tasks or task options.命令结构为gradle [taskName...] [--option-name...],多个任务用空格分隔。
下面将一些常用命令分类并列举。
Gradle相关
查看Gradle版本
可以在gradle->wrapper->gradle-wrapper.properties文件下查看distributionUrl所使用的gradle版本下载地址:
distributionUrl=https\://services.gradle.org/distributions/gradle-8.9-bin.zip也可以在命令行中使用.gradlew -version或者./gradlew -v:
------------------------------------------------------------
Gradle 8.9
------------------------------------------------------------

Build time:    2024-07-11 14:37:41 UTC
Revision:      d536ef36a19186ccc596d8817123e5445f30fef8

Kotlin:        1.9.23
Groovy:        3.0.21
Ant:           Apache Ant(TM) version 1.10.13 compiled on January 4 2023
Launcher JVM:  23 (Oracle Corporation 23+37-2369)
Daemon JVM:    C:\Program Files\Java\jdk-23 (no JDK specified, using current Java home)
OS: Windows 11 10.0 amd64升级Gradle
常见的升级Gradle有3种方式。
第一种,先手动修改wrapper.properties文件下distributionUrl指向的版本,再手动修改Android Gradle Plugin(AGP)版本,然后重新sync。
第二种,打开file>Project Structure修改AGP和Gradle的版本,然后apply。
第三种,使用命令行(官方推荐):
./gradlew wrapper --gradle-version 7.5.1编译命令
检查依赖并编译打包:
./gradlew build编译并打出Debug包:
./gradlew assembleDebug编译打出Debug包并安装:
./gradlew installDebug编译并打出Release包:
./gradlew assembleRelease编译打出Release包并安装:
./gradlew installReleaseDebug/Release编译并打印日志:
./gradlew assembleDebug --info
// or
./gradlew assembleRelease --info清除命令:
./gradlew clean清除构建目录下的产物,等同于Build->Clean Project。
卸载命令
卸载debug/release包:
./gradlew uninstallDebug
// or
./gradlew uninstallRelease也可以通过adb执行,只不过需要执行包名:
adb uninstall com.generals.wanandroid_multi调试命令
当我们遇到编译错误的时候,经常会看到这个提示:
* Try:
> Run gradle tasks to get a list of available tasks.
> Run with --stacktrace option to get the stack trace.
> Run with --info or --debug option to get more log output.
> Run with --scan to get full insights.编译并打印堆栈日志:
./gradlew assembleDebug --stacktrace
// or
./gradlew assembleDebug -s有时候构建日志会有很多,看到的可能不全,甚至不是真正的编译问题,而构建日志又不能像logcat那样可以可视化的筛选,这个时候就需要用日志级别来筛选一下。
-q,--quiet
仅记录错误。

-w,--warn
将日志级别设置为警告。

-i,--info
将日志级别设置为信息。

-d,--debug
调试模式(包括正常的stacktrace)。任务相关
查看主要Task:
./gradlew tasks查看所有Task:
./gradlew tasks --all执行Task:
./gradlew taskName
// or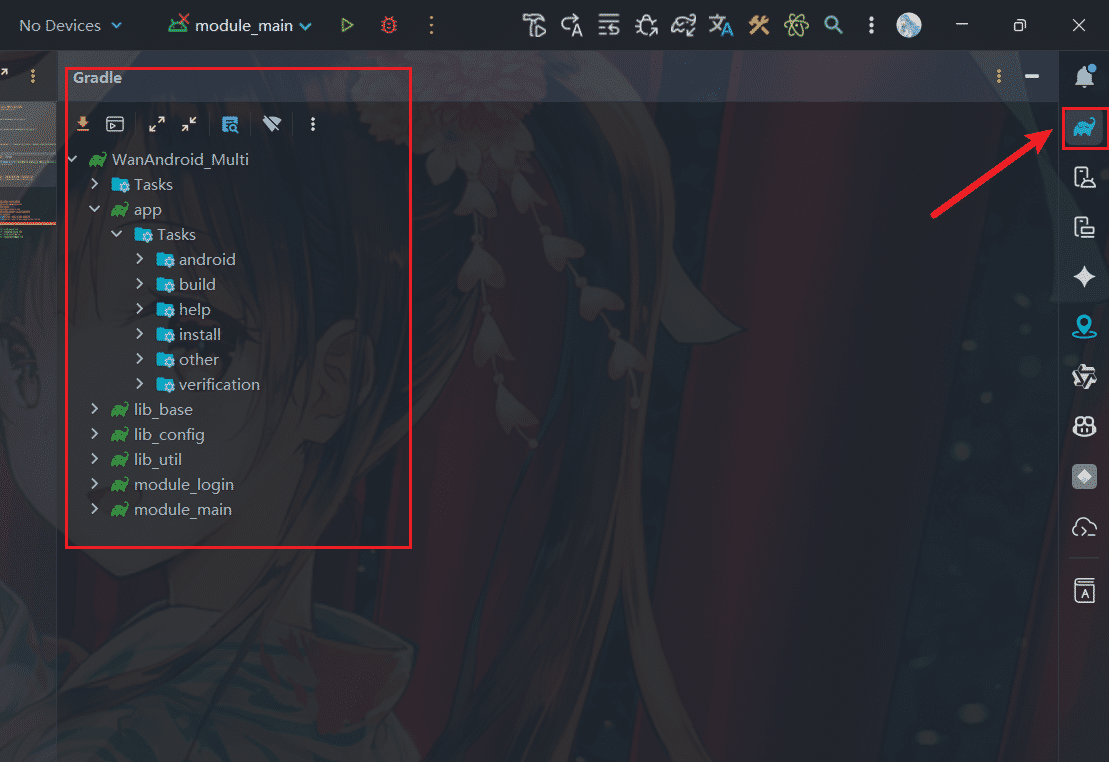
./gradlew :moduleName:taskName当然,通常用的是AS自带的Gradle工具,能够查看项目以及module的Task,点击可以执行。
查看依赖
查看项目根目录下的依赖:
./gradlew dependencies查看app模块下的依赖:
./gradlew app:dependencies查看依赖输出到文件:
./gradlew app:dependencies > dependencies.txt性能相关
离线编译:
./gradlew assembleDebug --offline构建缓存:
./gradlew assembleDebug --build-cache // 开启

./gradlew assembleDebug --no-build-cache // 不开启配置缓存:
./gradlew assembleDebug --configuration-cache // 开启

./gradlew assembleDebug --no-configuration-cache // 不开启并行构建:
./gradlew assembleDebug --parallel // 开启

./gradlew assembleDebug --no-parallel // 不开启上面几个配置都可以在gradle.properties中配置。
编译并输出性能报告:
./gradlew assembleDebug --profile性能报告位于构建项目的/build/reports/profile/路径下。
动态传参
再来介绍一个比较常用的传参属性,--project-prop,我们一般常用-P表示,用来设置根项目的项目属性。
获取参数:
./gradlew assembleDebug -PisTest=true这里我们用-P传入了一个isTest字段,并赋值为true。
然后我们在build.gradle里编写如下代码:
if (hasProperty("isTest")){
    println("---hasProperty isTest yes")
}else {
    println("---hasProperty isTest no")
}这样就能获取参数,module或插件也可以这么获取:
project.property('isTest')用getProperty()也可以获取参数值:
if (project.hasProperty("isTest")) {
    println("---hasProperty isTest yes")

    val isTest = project.property("isTest").toString().toBoolean()
    if (isTest) {
        println("---isTest true")
    } else {
        println("---isTest false")
    }
} else {
    println("---hasProperty isTest no")
}在kotlin中,也可以写成下列形式:
kotlinval isTest = project.findProperty("isTest")?.toString()?.toBoolean() if (isTest != null) { println("---hasProperty isTest yes") if (isTest) { println("---isTest true") } else { println("---isTest false") } } else { println("---hasProperty isTest no") }
构建核心——Task
Task是什么
前面提到过,Task就是一个任务,gradle中的最小的构建单元,而gradle构建的核心就是由Task组成的有向无环图:
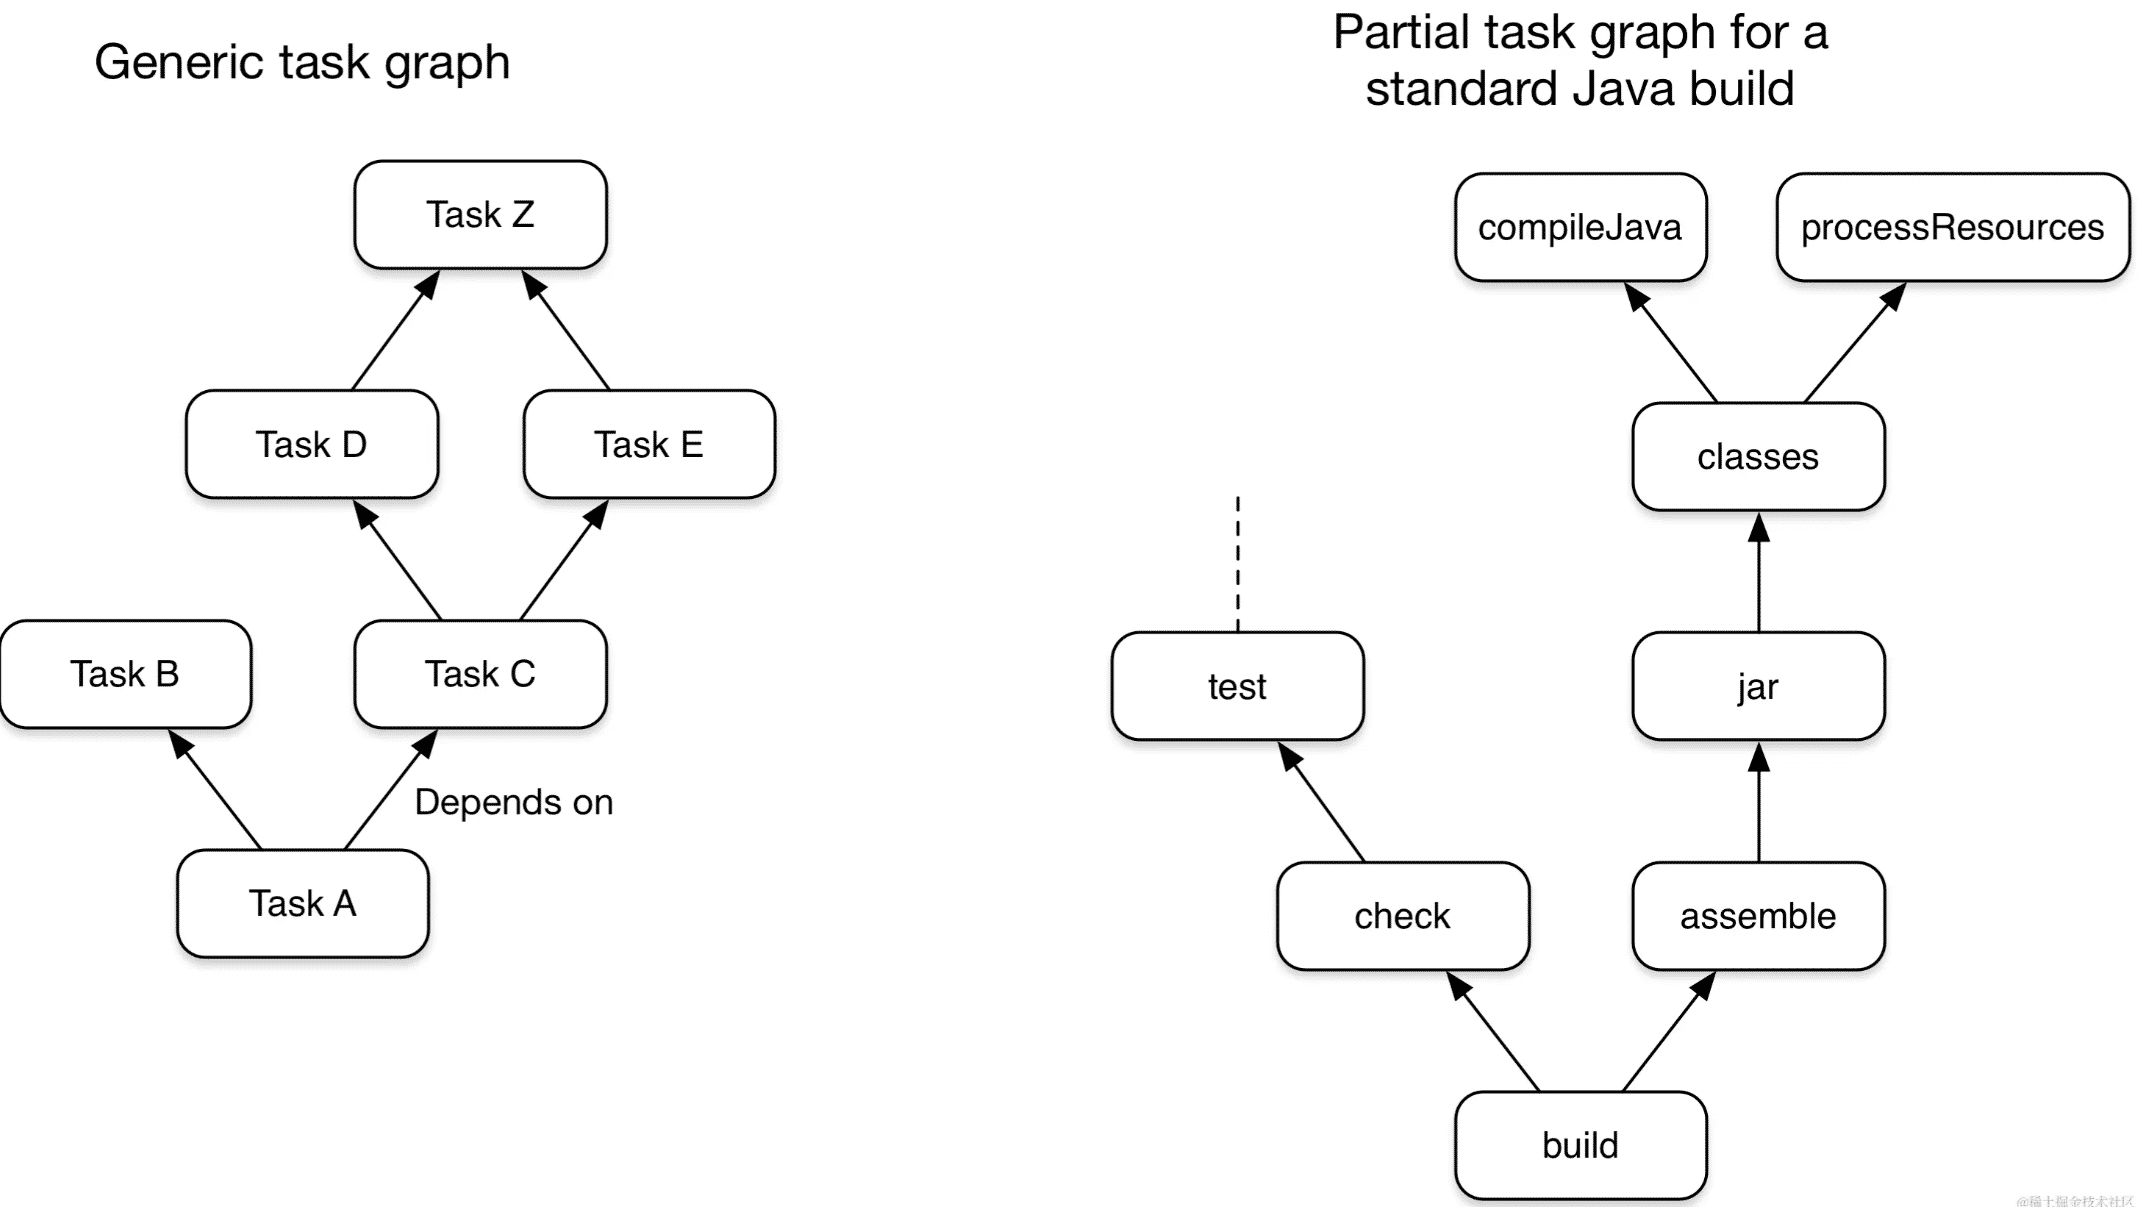
Task主要是管理了一个Action的List,既可以在List前面插入Action(doFirst),也可以在list后面插入Action(doLast),Action是最小的执行单元。
创建Task
我们可以直接在build.gradle文件中创建Task,因为一个build.gradle文件对应一个Project对象,而Task的来源需要先确定哪些项目参与编译,这里的项目我们即认为是这个Project对象。故我们可以直接在build.gradle文件中创建Task。
创建Task需要使用TaskContainer的register方法,有下列这几种方式:
register(String name, Action<? super Task> configurationAction)
register(String name, Class type, Action<? super T> configurationAction)
register(String name, Class type)
register(String name, Class type, Object... constructorArgs)
register(String name)
常用的是1,2。其中configurationAction指的是Action,即Task的操作,type类型指的是Task类型,可以是自定义类型,也可以是指定自带的Copy,Delete,Zip,Jar等类型。比如我们这里创建一个Task:
tasks.register("testTask") {
    println("Task name: ${this.name}")
}在Project中也提供了直接创建Task的方法:
task("testTask") {
    println("Task name: ${this.name}")
}执行Task
执行单个Task
终端输入命令:
./gradlew taskname当然,也可以点击任务左边的绿色三角形运行。运行结果如下:

执行多个Task
./gradlew taskname taskname tasknameTask之间不能同名,如果同名则会编译失败。
Task的执行结果
编译时Task后面会有一个标签,表示Task的执行结果:
> Task :app:createDebugVariantModel UP-TO-DATE
> Task :app:preBuild UP-TO-DATE
> Task :app:preDebugBuild UP-TO-DATE
> Task :app:mergeDebugNativeDebugMetadata NO-SOURCE
> Task :app:compileDebugAidl NO-SOURCE
> Task :app:compileDebugRenderscript NO-SOURCE
> Task :app:generateDebugBuildConfig UP-TO-DATE- EXCUTED 表示Task执行
- UP-TO-DATE 表示Task输出没有改变
- FOME-CACHE 表示可以从缓存中复用上一次的执行结果
- SKIPPED 表示跳过
- NO-SOURCE 表示Task不需要执行
Task的Action
Action就是编译时所需的操作,可以有多个,多个Task一半是我们在自定义的时候使用。
自定义Task
abstract class CustomTask : DefaultTask() {
    @Internal
    var taskName = "custom"

    @TaskAction
    fun customAction1() {
        println("$taskName -- Action1")
    }

    @TaskAction
    fun customAction2() {
        println("$taskName -- Action2")
    }

}

tasks.register("customTask", CustomTask::class.java) {
    taskName = "myCustomTask"
}- 自定义一个抽象类,继承自
DefaultTask - Action方法要添加
@TaskAction注解 - 对外暴露的参数需要使用
@Internal注解
使用时传入自定义的Task的类就好了:
> Task :app:customTask
myCustomTask -- Action2
myCustomTask -- Action1- doFirst:属于Action的一种,在Task Action的头部执行。可以有多个。
- doLast:属于Action的一种,在Task Action的尾部执行。可以有多个。
tasks.register("taskk") {
    doFirst {
        println("$name = doFirst 111")
    }
    doFirst {
        println("$name = doFirst 222")
    }

    println("Task Name = $name")

    doLast {
        println("$name = doLast 111")
    }
    doLast {
        println("$name = doLast 222")
    }
}上述代码的执行结果:
Task Name = taskk

> Task :app:taskk
taskk = doFirst 222
taskk = doFirst 111
taskk = doLast 111
taskk = doLast 222Task Name的输出是在Gradle生命周期的配置阶段,因为它就在闭包下面,不在任何Action里,没有执行时机,配置阶段解析到这个Task就会执行println。
其他输出都是在Task :app:yechaoa下,因为有明确的Action执行时机。
Action执行顺序
doFirst(倒叙)->Action(倒叙)->doLast(正序)
Task属性
Task有下面几个属性:
    String TASK_NAME = "name";

    String TASK_DESCRIPTION = "description";

    String TASK_GROUP = "group";

    String TASK_TYPE = "type";

    String TASK_DEPENDS_ON = "dependsOn";

    String TASK_OVERWRITE = "overwrite";

    String TASK_ACTION = "action";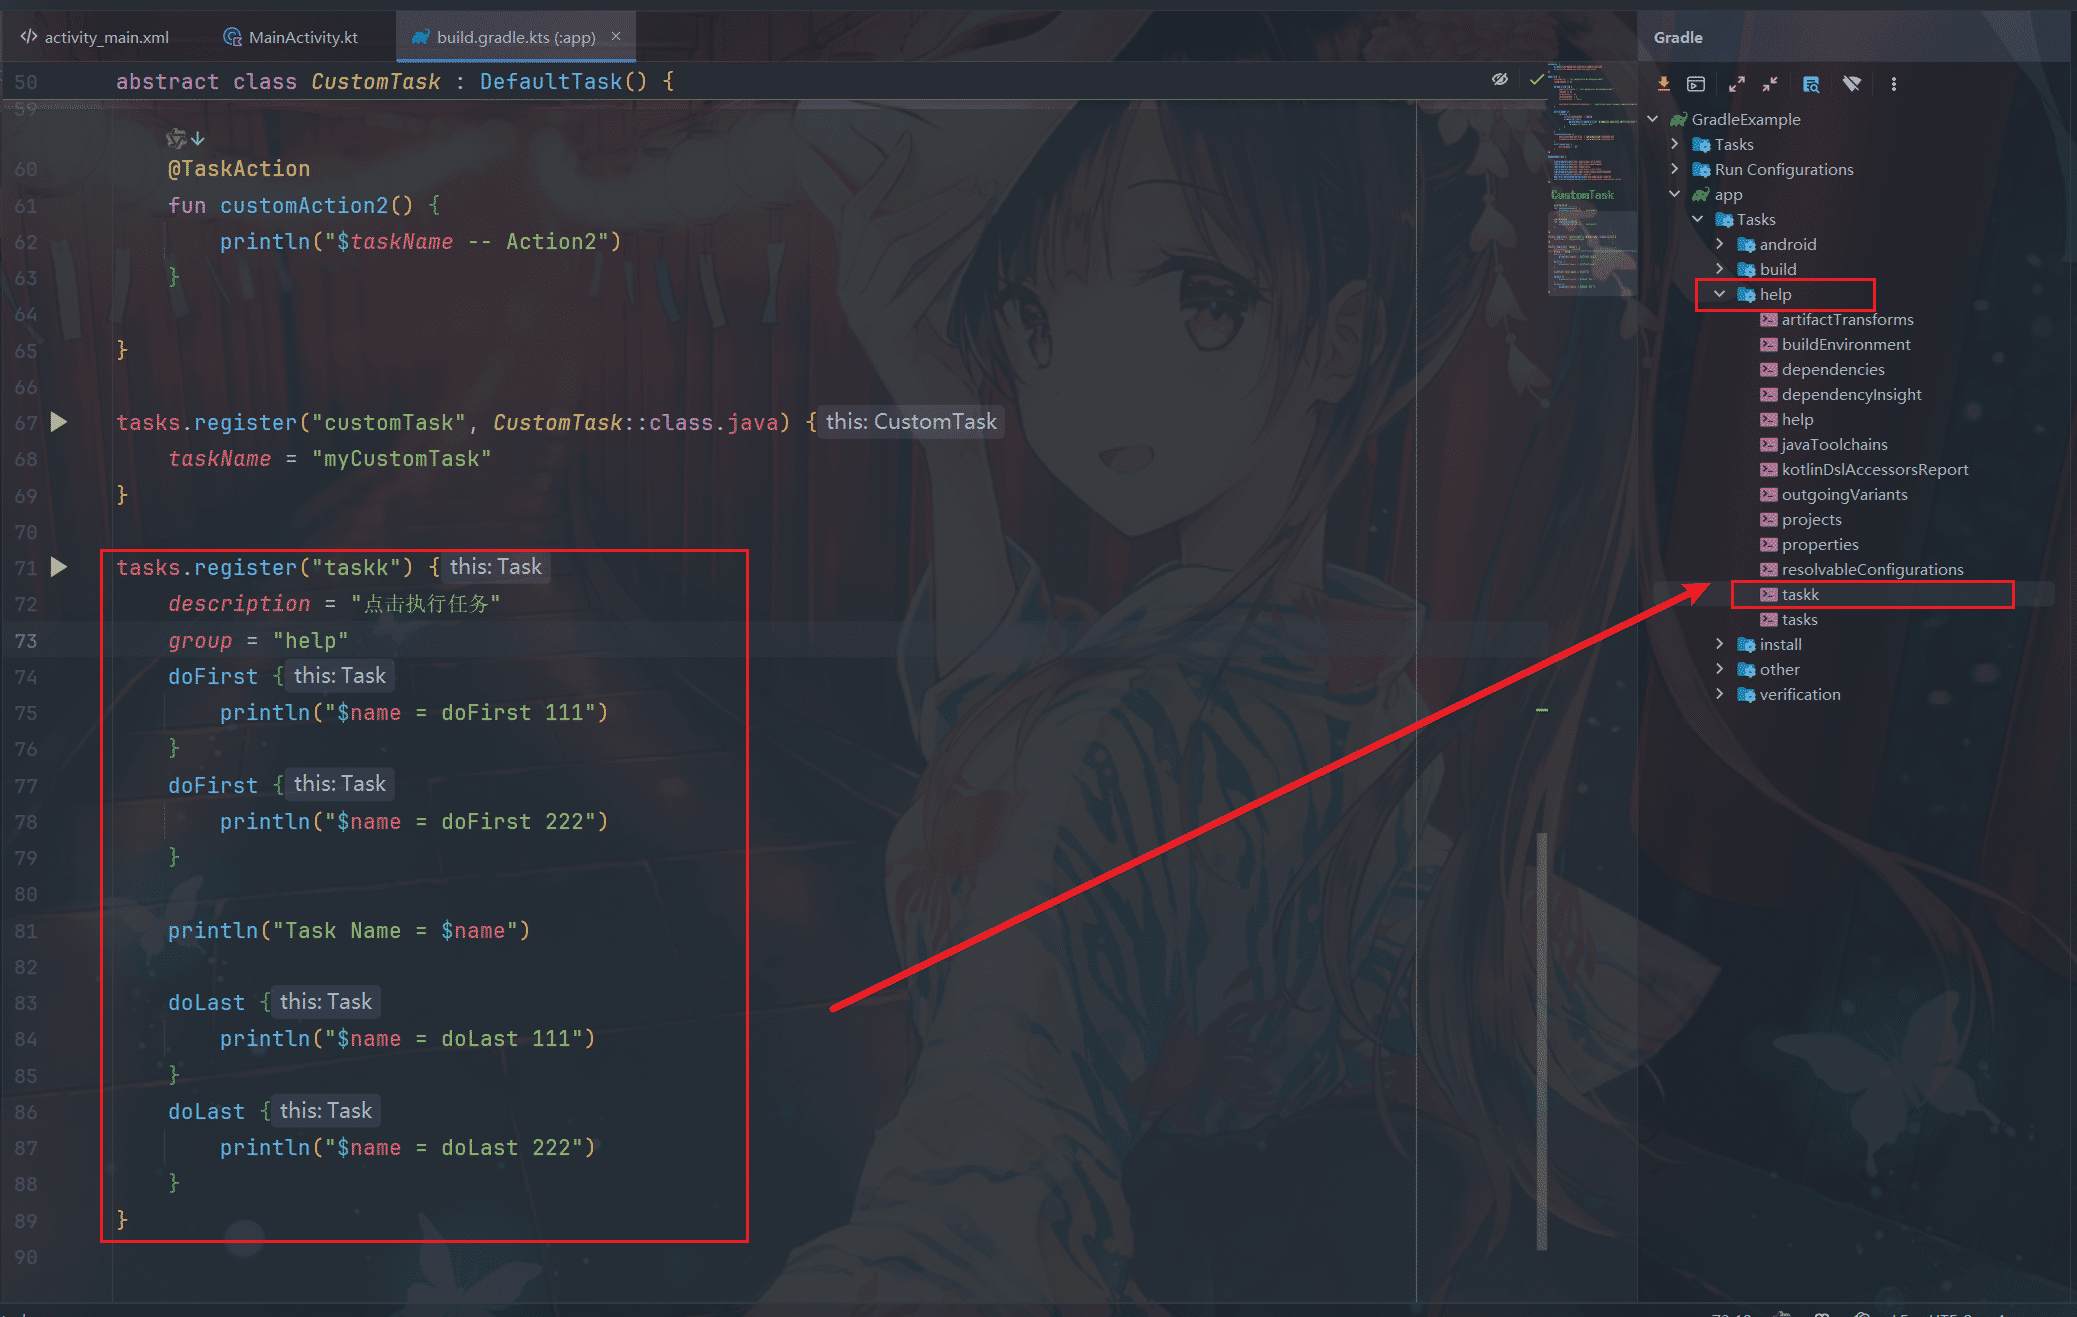
配置了属性和分组后,可以在AS右侧可视化面板看到这个任务,双击就可以执行。
Task依赖
dependsOn
tasks.register("task111") {
//    dependsOn(tasks.named("task222"))
    dependsOn(tasks.matching { it.name.contains("task222") })
    doLast {
        println(name)
    }
}

tasks.register("task222") {
    doLast {
        println(name)
    }
}输出结果:
> Task :app:task222
task222

> Task :app:task111
task111> Task :app:task222
task222

> Task :app:task111
task111常用的是下列这种写法:
val task111 = tasks.register("task111") {
    doLast {
        println(name)
    }
}

val task222 = tasks.register("task222") {
    doLast {
        println(name)
    }
}

task111.dependsOn(task222)这里dependsOn()也即可以是名称也可以是路径,也可以是一个type类型,其他项目的project也可以:
task111.dependsOn("project-lib:xxx")finalizedBy
为Task添加指定的终结器任务。也就是指定下一个执行的Task,dependsOn指定的是上一个。
mustRunAfter
task111.configure {
    mustRunAfter(task222)
}这时候执行task111时会发现222并没有执行,我们要查看依赖关系需要一起执行:
./gradlew task111 task222然后就能看到结果了。
shouldRunAfter
与mustAfter写法一致,规则也类似,但不太一样,因为它在两种情况下会被忽略。首先,如果使用该规则会引入一个排序周期;其次,当使用并行执行时,除了“应该运行”任务外,任务的所有依赖项都已满足,那么无论其“应该运行”依赖项是否已运行,都将运行此任务。
跳过Task
条件跳过
Gradle提供了onlyIf(Closure onlyIfClosure)方法,只有闭包的结果返回True时,才执行Task。
tasks.register("skipTask") {
    onlyIf {
        providers.gradleProperty("aaa").isPresent
    }
    doLast {
        println("$name is Executed")
    }
}执行:
./gradlew skipTask -Paaa输出:
> Task :app:skipTask
skipTask is Executed这里的条件是判断是否有aaa这个参数,即加上-Paaa后才会执行这个Task。
异常跳过
如果onlyIf不满足需求,也可以使用StopExecutionException来跳过。
StopExecutionException属于异常,当抛出异常的时候,会跳过当前Action及后续Action,即跳过当前Task执行下一个Task。
禁用跳过
每个Task都有一个enabled开关,false表示禁用,禁用后任何操作都不会被执行。
超时跳过
timeout = Duration.ofSeconds(10)如果Task的运行时间超过指定的时间,则执行该任务的线程将被中断。